As good as cable machines are for commercial and home gyms, they break down occasionally. The most common issues include frayed or broken cables.
When a cable machine broke in my home gym, I took a break to research potential ways to fix it.
However, after 15 hours of extensive research, my colleagues at Total Shape and I concluded that ordering and placing a new cable was the only way.
After reading this article, you will have everything necessary to repair your home gym cable.
Quick Summary
How to Repair a Home Gym Cable: Step-By-Step Guide

Repairing a home gym cable can seem daunting at first. However, you can easily fix it by following the steps below.
"If you decide to purchase a lot when creating your home gym, then there will be a decent amount of upfront costs. However, you can save money over time when comparing your upfront costs to the monthly gym membership and gas expenses you pay over time."
- Alex Polish, Certified Personal Trainer
1. Order a Custom Replacement Cable
The first step is buying a new home gym equipment cable.
Don't worry about getting expensive ones from the original manufacturer; I've used replica cables effectively in many home gyms.
If you are looking for a cheap alternative to the original cable, TK Star may be your best option.
However, if you want the same replica, order one from the machine's manufacturer.
2. Take Note of the Cable's Route
The first rule after the cable arrives is to wait to jump to the replacement. Take time to note how it's rooted first.
In addition, take pictures or draw necessary diagrams and write notes to avoid unnecessary complications when installing a new cable.
3. Remove the Old Cable
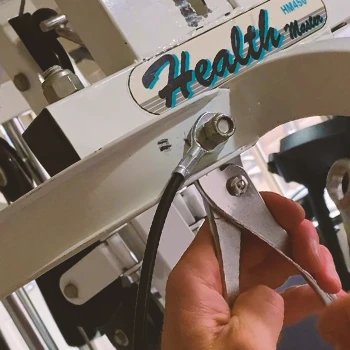
You will need some tools to remove the old cable. Specifically, you will need a screwdriver, a wrench, and wire cutters.
Start by loosening the cable's end attached to the machine using a wrench or a screwdriver. If the hardware doesn't fit through the machine's pulley, use a set of wire cutters. Cut through the cable instead of removing the pulleys.
4. Run the New Cable
Run the cable through the pulleys before attaching the hardware to the new cable. This is because you won't have to worry about disassembling the machine. Use previously created diagrams, notes, and pictures to make sure the route is correct.
If you skipped that step, use the user's manual instead; if the cable isn't of appropriate length, cut it in now using the wire cutters.
5. Attach the New Cable to the Machine

When you finish running the new cable through the pulleys, attach it to the hardware. You must start by mounting the cable on the side of the weight by attaching it to the top of the weight stack.
6. Finish the Job
Pull the slack out of the line, leaving just about two millimeters of slack in the cable. There is still hardware attached to the other end. You should only attach the eyelet once the cable is sized correctly.
Remember to put the little ball back on before attaching it. You cannot get it later once you install all the necessary hardware.
Other Repair Solutions for Home Gym Cables

Generally, there are only two more solutions to repairing your home gym equipment cable:
- Fixing your cable — Fixing a broken cable with black electrical tape is often ineffective and short-lived, representing the worst option. For damaged rubber casings, consider more innovative, again temporary, solutions like a vinyl grip compound to improve durability and handling.
- DIY gym cables — The last option is to build your replacement cable. It is the most challenging option and will require you to buy some hardware and measure the cable length. The only benefit of this method is that it's more affordable than buying a replacement.
How Can You Make Your Gym Machine Cables Last Longer?
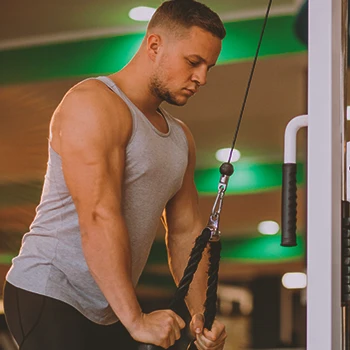
To make your home gym cable machine last longer, ensure the cable doesn't touch anything except the pulleys. This is because rubbing on anything will make it wear off quicker.
In addition, ensure your cable is running through all the pulleys and keep the pulleys spinning smoothly.
From my time coaching and maintaining gym equipment, I've learned that ensuring cables spin freely is key to their longevity. Lubrication can help, but it isn't always necessary.
More importantly, as I've seen firsthand, proper storage in a dry environment is crucial to prevent rust and physical damage.
Related Articles:
FAQs
How Do You Tighten Gym Cables?
To tighten gym cables, locate where the cable meets up with the pulley and unscrew the bolts. After removing your pulley, reattach it with all the screws and tighten them slowly until you reach the desired resistance.
When Should I Replace My Gym Cable?
You should replace your gym cable when they have cracked or broken nylon coating. In addition, replace your home gym cable if surface damage, hairline cracks, or damaged bearing is present.
Is Making Your Gym Machine Cables Safe?
Yes, making your gym machine cable is safe, but only if you use quality materials and everything is attached as it should. If made and replaced correctly, the DIY cables can be as strong and useful as the original ones.
What Is the Best Home Gym Cable Crossover Machine?
According to the Total Shape team, the best home gym cable machine is the one built from high-quality, long-lasting material and doesn't occupy all the space in your gym.
The right cable machine can add variety to your workouts and save you space due to its diversity.
At home, I have a Body-Solid cable machine, which has helped me build the physique I have today.
Here is an excellent guide on the best cable crossover machines to help you choose the one most suitable for your home gym.
About The Author
You May Also Like


