The gym I work at has had a safety squat bar for a few years, and it’s the main tool I recommend to any athlete with rotator cuff issues.
But even if you don’t have a physical reason to use it, you could still get some great value and performance benefits from this training tool.
I’ve worked with powerlifters and even baseball players to use these exercises in a few variations.
And in this article, I’ll share all details I give those clients.
Quick Summary
- The benefits of safety squat bars include focusing on leg muscles, building core muscles, improving balance, reducing strain on joints, and working on your posterior muscles.
- Safety squat bar features to look for are padding, handles, and bar angle.
- Users of safety squat bars often report a significant decrease in shoulder and neck discomfort compared to traditional straight bars, though specific statistics may vary.
- In my opinion, incorporating a safety squat bar into a fitness routine can be a game-changer, especially for those with previous shoulder or back issues.
Main Benefits Of A Safety Squat Bar
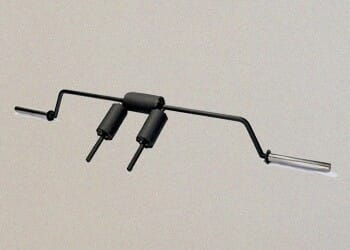
The safety squat bar is a piece of equipment that looks completely different from a regular barbell.
It has handles that go over your shoulders, and a significant bend towards the weight plate ends.
And that unique bar design is what gives you many significant benefits.
1. Teaches Better Form
During squats, you have a movement pattern that involves your knees, hips, and entire back.
The squat position has to be one seamless motion; otherwise, you’re setting yourself up for a bad back injury.
One problem people often have with squat training is that they struggle to keep the barbell in the right position.
With the added handles on a safety squat bar (SSB), you can position your hands in front of your shoulders to maintain control over the position of the bar.
I've found that using the safety squat bar significantly improved my squat form. The handles helped me maintain a more upright posture, reducing the strain on my lower back.
That allows me to focus on my body movement during squat training rather than controlling the weight.
2. Focuses On Leg Muscles

The primary focus of squats is on leg muscles, and with the slightest variation, you can build up maximum strength in your quads, hamstrings, and glutes.
One challenge athletes often have is that the further down they go, the more they feel losing control over the barbell.
With specialty bars like an SSB, the bar position on your upper back is a lot more secure, and the full-body training effect for athletes is that they gain more confidence to go lower with their hip flexion.
And the lower you go in squats, the more strength and size you’ll gain in your legs.
3. Builds Core Muscles

According to a 2020 article published in Harvard Health, the muscles in your legs will engage to full power because they carry the most weight of the strength exercise.
But by fully engaging your torso, your body will force some strength gains and better posture [1].
The added bonus from safety bar squats comes from the camber on the bar that tends to push your body forward.
You have to resist that force by engaging your ab muscles, which is why this is such a great option for all athletes, not just those with shoulder mobility issues.
In my experience, the forward pull of the safety squat bar really forced me to engage my core, enhancing my overall stability and strength.
4. Improves Balance And Stability
An SSB will make it a lot easier to maintain your balance, especially if you load up the bar with some heavy plates.
The handle gives you more control over your center of gravity without your shoulders coming under too much strain.
While this might not be an issue for an experienced powerlifter using a regular barbell, most beginners and even amateurs often struggle with balance, making them reluctant to do squats with bigger loads.
Try it out for yourself and see how much easier it is to keep stable with a straight back and perfect posture. It’s the ideal solution.
5. Works Your Posterior Muscles

The safety bar squat also makes it easier for you to strengthen the entire muscle range in your back.
This includes the lats and traps, all the way down to your lumbar and gluteal region.
The reason it’s called the posterior chain of muscles is that they all work together to provide body strength along your spine.
A 2014 study from Ace Fitness says the challenge with training these muscles is that many types of exercises increase the amount of strain directly on your upper back musculature and disks if you have potential weaknesses [2].
And that can quickly lead to herniated disks or ligament damage.
But with the controlled support of the weight on your shoulders that you gain from an SSB, you significantly reduce the pressure on the spine, giving you a better chance to build up the back muscles.
6. Reduces Strain On Joints

I’m all about the importance of injury prevention, and if you see some of the mistakes I have, then you’d understand why people should prioritize training safety.
No matter how experienced you are with a straight bar for squats and a bench press, you’re going to put some pressure on your back and joints.
In my opinion, there are no rewards for being a hero with a straight bar unless you’re training for a competition lift.

Main Safety Squat Bar Features To Look Out For

There are a few variations of safety squat bars that slightly change the shape and design.
Unless you have some very specific requirements, these are the three things most athletes need to look at.
1. Handles
One feature the specialty bar should always have is handles that allow you to control the bar while gripping them with your hands in front of your body.
These are usually designed to go straight over each shoulder, giving you a bit of a leverage effect from the positioning.
2. Padding
Yes, you could be a hero and do your squats with no padding on a straight bar. But it will severely limit the maximum load, especially if you have limited shoulder mobility.
Instead, pick the bar with plenty of padding on the bar and handle section to make it a less painful experience.
3. Bar Angle
You should notice that the angle of the handle is slightly different from the angle of the camber near the weight plates.
This is important for squat training as it helps to keep the equipment centered and in place during your lifts, making it easier to focus on the squat.
How Do You Squat With A Safety Squat Bar?

Safety bar squats are much easier than regular barbell squats, but that’s no excuse not to pay attention to proper form and posture.
One of the main reasons people get injuries doing a squat is because they haven’t had someone show them the proper back alignment.
So, if this is a new exercise for you, get a coach at your gym to spend 10 to 15 minutes with you.
Here’s the proper way to do it.
1. Starting Position
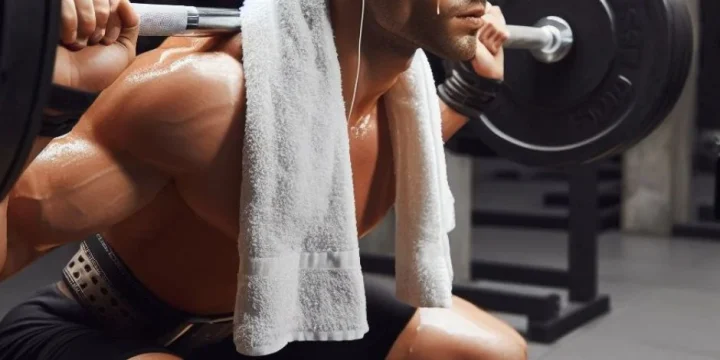
The starting point for an SSB squat is pretty much the same as a regular squat. Set the bar up in the frame so that you can comfortably stand under the bar and push it up a few inches by standing tall.
Once the height is set, add the plates, and then make sure the pad of the bar is below your neck and above your shoulder blades.
Grab onto a handle with each hand, lift the bar off the frame and take a small step forward.
2. Downward Movement

Pay close attention to the neutral curve on your spine and aim to maintain that posture from start to finish.
Slowly bend your knees, allowing your butt to drop down and go as low as you feel comfortable for a count of 3.
3. Upward Push
Once you get to the bottom, use your leg strength to power yourself back up again for a count of 2. This should be an explosive move, but you have to keep your back posture straight and fully engage your abs.
“Tightening your stomach will help brace your back for action. Activate your stomach by tightening up your belly, as if someone were going to sock you in the gut. Think of pulling your belly button to your spine and clenching your entire core.”
- Mark Bell, Strength Coach & Writer for bodybuilding.com
It’s where most potential injuries happen and why working with coaches is a good safety choice to make.
Sample Exercise Variations

Let’s see what’s on the menu for a new squat training program.
1. Standard Safety Bar Squat
All the coaches at my gym now highlight the advantages of the safety bars over the standard barbell squats equipment.
Lifters of all experience levels will see the same strength gains without a variety of squatting problems.
2. Split Squats
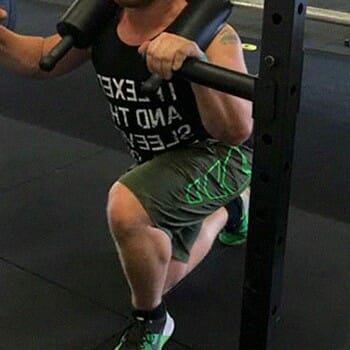
When you do a split squat variation with a bar, it’s going to look a bit more like walking lunges.
Make sure you don’t fully load the SSB and then get into a lunge position.
Transfer your balance with an emphasis on the front leg, and then lower yourself down and up again.
The back foot is mainly there for support and balance.
3. Squat Step-Ups
You’ll need a small step for this, and it adds a nice bit of extra strain to your squatting routine.
Make a regular squatting move and when you get back to the starting point, take one step up on the box and back down again.
The higher the box, the more straining it is, but avoid adding too much stress on the knee joints.
FAQs
Is It Easier to Squat With a Safety Bar?
Yes, it is easier to squat with a safety bar. With a regular straight bar, you have less control over the balance.
It’s also more difficult to keep it level and stop it from rolling down your back.
Can You Front Squat With a Safety Squat Bar?
Yes, you can front squat with a safety squat bar. In fact, it’s a lot more comfortable as this barbell group generally has padding that reduces pressure points.
What Muscles Work With a Safety Squat Bar?
A safety squat bar mainly works your leg muscles and glutes. But you’ll also find that you engage your abs and back during a safety bar workout.
References:
- https://www.health.harvard.edu/blog/strengthening-your-core-right-and-wrong-ways-to-do-lunges-squats-and-planks-201106292810
- https://www.acefitness.org/resources/pros/expert-articles/5012/the-posterior-chain-workout/
About The Author
You May Also Like
